Thursday, May 19, 2016

21 Beautiful Terrace Garden Images You should Look for Inspiration

21 Beautiful Terrace Garden Images You should Look for Inspiration

If you want to create a garden on terrace or you already own one, inspire yourself with these 21 ‘Beautiful Terrace Garden Images’.

To make a beautiful terrace garden, arrange everything neatly, do not use more than 3-5 colors on your terrace. Plan everything on paper, determine a theme and the ambiance you would like to create there and work accordingly.

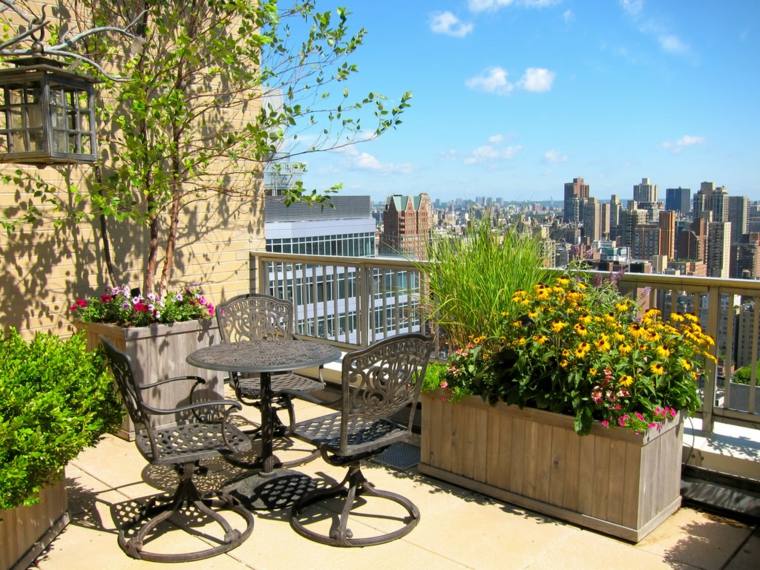
1.Create an alluring container garden on terrace, grow flowers to embellish it. Most of the terraces are sunny and flowers are easy to grow. Make a lovely flower garden with combination of both perennials and annuals equally.

2.If you want to create a serene and calm garden on terrace, use colors like blue, green, indigo, pink and white instead of bright colors.

3.Grow lot of vines and dwarf trees near the walls. These will use your vertical space efficiently.

4.Create a low maintenance garden on terrace, if you are unable to do lot of care. Read these low maintenance garden tips.

5.If you want to make a lush green garden, grow lot of dwarf conifers and ferns on your terrace. These will give an elegant look with wooden deck and furniture.

6.This garden on terrace is simple yet good looking, not so many colors and accessories are used.

7.Excellent use of old tires you can see here, these planters are made after doing some DIY hacks. See these DIY tire ideas for more.

8.Both lavender and allium (ornamental onion) love sunny spot and well drained soil, growing them on terrace is easy too.

9.Floor plays an essential role in creating a beautiful terrace garden. You can also use pebbles to add an extra element.

10.Making a lawn on terrace is possible too. You’ll have your best seating place above your urban dwelling, if you’ll create a terrace lawn.

11.Create a cottage garden like setup, wild and overgrown terrace garden that will give you peace of mind. In the garden you can white nicotianas are grown for scent and lavender in other corner with lot of perennials capturing the eyes. You can see more about this on Gardenista.

12.What’s not you can do on your terrace? Make a water garden, if you love to grow aquatic plants.

13.If you have a north or east facing terrace, you do not receive full sun. In that case grow plants that grows well in partial sun. Ferns, Ivies, violets and pansies are good choice for such terrace gardens.

14.Make raised beds on your terrace to grow trees, this is a good idea if you want to grow large shrubs or trees that have deep roots.

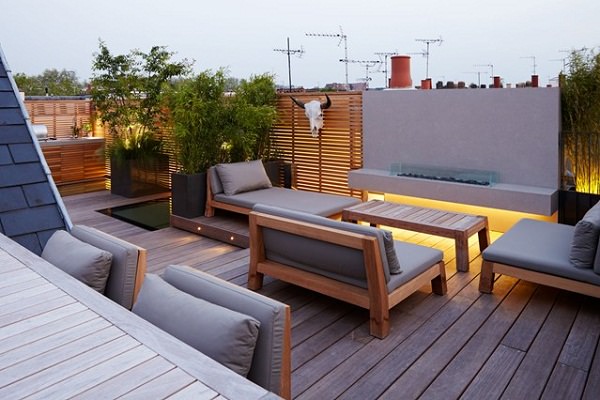
15.Classy and elegant, deck tiles are looking beautiful on this terrace in the evening. If you don’t want to grow lot of plants on your terrace, simply put some potted plants in the corner.

16.Make your beautiful terrace garden more zippy at night so you can savor your dinner there, do some lightning and you will all set to enjoy.

17.Growing a lawn needs lots of maintenance and care and if you are worried about this, use synthetic grass, it is a good option for both terrace and balcony gardens.

18.Using light colored furniture is a great idea to follow on terraces, because light colored furniture don’t heat up early.

19.Grow dwarf trees and bamboos for terrace garden privacy.

20.You can grow annuals under potted trees, this is a good idea for limited space like terrace.

21.Terraces are of limited space so it is good to use fold-able furniture to save space.

23 Terrace Garden Tips to Turn it into an Urban Oasis

23 Terrace Garden Tips to Turn it into an Urban Oasis | Rooftop Gardening Tips

These 23 (Rooftop) Terrace Garden Tips will help you in transforming your urban space into a green oasis.

You love to garden but you don’t have a piece of land. No problem, you can have a garden on the rooftop, however small. It is not necessary to abandon the idea of being able to create a natural paradise. There are many tricks and clever ideas to do this and here are a few rooftop gardening tips that’ll help you.

Terrace Garden Tips

1.Create a theme for your rooftop garden and stick to it. Choose plants, furniture, and other accessories according to it.

2.Creating green walls and hedges can completely transform a rooftop terrace into an unbelievable outdoor area that can even look like a regular garden. For this, create tall and dense vegetation around all the corners that will offer you total privacy and a perfect setting for outdoor dining and relaxing moments surrounded by nature.

3.In our terrace garden tips, lighting is very important. Good lighting can enhance the beauty of the vegetation. This way you can enjoy the evening on the rooftop garden.

4.A roof-top has a parapet or breastwork, make that low wall little high so that you can use that as a support for growing climbing plants and creepers and if you need shadow in sitting area, umbrellas in light colors are perfect.

5.Flowering annuals can completely transform the look of any garden when they bloom all together. You can plant different species of flowers for every season. Opt for a combination of two or three colors to create a harmony is a good idea.

6.While choosing furniture, take care that they are light, durable and must not take too much space.

7.Although small, this rooftop garden is totally unique and appealing with the addition of two interesting things: The ivy topiary and a large mirror, which opens the view and creates the illusion of enlarged space. Adding a mirror is one of the useful rooftop gardening tips.

8.If tall buildings surround your terrace or you have got an interesting view from there then it makes no sense to try to get privacy. Instead, concentrate on the open space and include large planters so that you can grow large trees in them.

9.You can also make a great looking, elegant terrace or roof top garden by just growing conifers and beautiful foliage plants.

10.Choose simple plants that love the direct sunlight and opt for designer containers. Do not make compromises– the planters are as important as what they contain.

11.Being able to enjoy a breath of fresh air right above your urban dwelling is wonderful. With a little creativity, you can turn the rooftop garden into an outdoor living room, adding a bar or a kitchen countertop is also a good idea.

12.Use as many natural materials as possible. For flooring use natural stones. Arrange wooden planters or construct beds using sandstone bricks. For seating you can buy tree stumps, they are inexpensive and do not take much of your space. This is a great way to create a more authentic and natural environment.

13.Bright colorful shrubs in combination with a neutral decor will create a dazzling effect and on the contrary if you have a colorful setup and gaudy furniture, grow neutral plants.

14.Choose a flooring style that is deep and bold and eye-catching. Keep the color combinations in mind to give a unique touch to the rooftop garden.

15.Whitish beige is a main color here combined with blue and yellow. Don’t use so many colors. Decide three or four main colors and use their shades, if you want more.

16.A terrace garden does not necessarily need to include a large number of plants, trees, and flowers. A manicured, lush green lawn and a couple of planters or well-maintained borders against the wall are sufficient to create an impressive style.

17.If you have a small rooftop, it is better to have a couple of big planters rather than so many small containers, so as not to overwhelm the space or create chaos and disorder.

18.Create raised beds all around the roof, raised beds can be metallic or made of wood. You can also construct permanent concrete raised beds. But before doing this, ensure your rooftop can bear that much weight. Read our article on how to construct a rooftop garden for more information.

19.Don’t want to grow so many plants? Place colorful and modern furnishings to transform a small space into an attractive sitting area.

20.Don’t forget to add a focal point on your urban terrace garden. Place something to allure the eyes. Adding the water element, through the insertion of a small fountain is a great idea, you can also create a small container pond.

21.Maximize the seating space of your roof or terrace by fixing wooden benches along the raised beds.

22.String lighting works wonderfully in open spaces. It enhances the small spaces. Most of the rooftops receive all day long sun and in such a case adding solar lights is a smart idea.

23.Each space has its own characteristics: Positive or negative. An outdoor area can be a challenge if it is long and narrow. If your space is similar, try using things of wavy, curvy and circular shapes.

How to Grow Taro (Arbi)

How to Grow Taro (Arbi) | Care and Growing Colocasia

How to grow Taro (Colocasia esculenta) in your garden. Growing taro is easy, you can also grow it in containers. Its corms and leaves are treated as vegetable and are used to prepare delicious tropical cuisines, it is also grown as an ornamental plant.

How to Grow Taro

Taro Propagation

Propagation of taro is usually done by planting corms, suckers or by division.

Planting Taro

Planting taro is done at the beginning of the spring, when weather conditions are more favorable for this herbaceous plant. Whereas, in tropics it can be planted all year round. Corms are planted 6 to 10 cm deep with a spacing of about 1 m between other plants and 1 m between the rows.

Growing Conditions

Taro (Colocasia esculenta), which is also called “Arbi” in South Asia grows best in hot and humid weather and the ideal temperature for growing taro falls between 68 F – 95 F (20 C to 35 C). The plant does not support low temperatures and won’t thrive below 50 F (10 C).

Requirements for Growing Taro (Colocasia)

Sun

Grow taro in partial shade or filtered sunlight.

Soil

Grow it in well-drained and fertile soil, which is rich in organic matter. Soil should be slightly acidic to neutral in a pH level between 5.5 to 6.5. Avoid compacted and clay soils.

Watering

Water frequently and deeply to always keep the soil moist. Adult plants are drought-resistant but don’t grow long in lack of water.

Some taro cultivars are grown in flooded places with running water or on the banks of waterways. Stagnant water sites are not suitable for them because the corms may rot more easily in these conditions.

Taro Plant Care

Weeding

Remove invasive plants and weeds that are competing for nutrients and resources, especially in the first three months of planting.

Fertilizer

Fertilizer you use should be high in nitrogen and potassium. Fertilize the plant with 24-8-16 fertilizer every month or according to the product instructions is enough for the healthy growth.

Pests and diseases

Taro plant pests are taro beetle (papuana uninodis), which recently became a problem and had been blamed for the loss of 40% of the harvested taro in Fiji. Cluster caterpillars and grasshoppers are other pests you should look for. In diseases nematodes and taro leaf blight can also be a problem.

Harvest

Taro corms (thickened underground stems, also called roots) are ready for harvest in 7 to 12 months (depending on the growing conditions and varieties) after planting. When leaves begins to turn yellow and corms starts to push out of soil. Corms should be dug up carefully without any damage.

Taro leaves and their petioles are also edible but only after being cooked and can be harvested any time, although they are less consumed than the corms.

*Note that the plant can cause mild irritation to skin, eyes and mucous membranes, so the harvesting should be done carefully and with the use of gloves.

Other Species called Taro

Some other plant species that are also called taro or elephant-ear:

Colocasia Gigantea – Sometimes called Giant elephant ear or Indian taro, its corms are inedible and only stems and leaves are consumed, mostly in Japan and Indian subcontinent.

Alocasia Macrorrhizos – It belongs to Araceae family, native to Malaysia and called Elephant ear taro, its leaves are pointed upwards or remain almost horizontal. Edible only after a long cooking time.

Cyrtosperma Merkusii – Practically grown only in Oceania and South Asia, it is planted in flooded areas, thus called Giant swamp taro. This plant grows 4 to 5 meters in tall and having up to 80 kg corms, which are also edible but only after a long cooking time.

Xanthosoma Sagittifolium – Also known as taro, it has leaves similar to leaves of Alocasia and Cyrtosperma genres but can be distinguished by the position of their leaves, pointing down.

How to grow Cardamom

How to grow Cardamom | Growing Cardamom (Elaichi)

How to Grow Cardamom, one of the most expensive spices in the world. Growing cardamom is moderately difficult but you can learn how to do it by reading this or visiting my blog for more.

http://www.bilalmirzasworld.blogspot.com/

Cardamom is one of the world’s most expensive spices after saffron and vanilla. It has a sweet, burning taste and a very distinctive spicy odor. Cardamom because of its variety of uses gained a reputation as the queen of spices (king, however, is black pepper).

Cardamom Types

Commonly, you can find two types of cardamom: Green (originating in India and Sri Lanka) and black (in Nepal and Himalayan states of India).

 Characteristics

Cardamom (Elettaria cardammommum) is a perennial plant. It has rigid and erect aromatic leaves, which forms the aerial part of the plant’s stems. These stems are between 2 to 4 meters high and forms a canopy of leaves around the plant.

Tiny cardamom flowers are beautiful and are usually white in color with a yellow or red strips over them.

Cardamom fruits are called capsules. Inside the fruits there are seeds of the plant, which are actually used as spice.

Propagation 

From seeds

You can propagate cardamom from seeds. You can try seeds you get from glossary store but those seeds are generally treated and not fresh. For best results buy seeds from seed store or online.

From Rhizomes

The easiest way to propagate cardamom is from division. For this, cut the rhizome with a sharp knife and carefully separate it from the plant.

Replant it under the similar conditions. Beware that this techinique will also transmit cardamom mosaic virus from mother plant to new plant, if it is infected.

Growing Conditions

Growing Cardamom is difficult, it requires specific growing conditions: Tropical, hot and humid climates are suitable for its growth. It grows in humid or very humid subtropical forests. Where temperature ranges mostly between 18 to 35 C. Humidity level for growing cardamom is usually near 75%.

Requirements for Growing Cardamom (Elaichi)

Position

Plant cardamom in a location with partial shade or filtered sun light, away from full direct sun as it grows up to 2 – 4 m in height under the canopy of much higher trees.

Soil

Sandy, loamy soil that is rich in organic matter and manure is optimal. It requires slightly acidic to neutral pH level around 6 – 6.8. It can also tolerate acidic soils down to 5.5 – 6.

Key to growing cardamom is right substrate, which should be well-drained in a way that water should drain out easily, but soil must remain moist constantly. By moist it doesn’t mean damp or waterlogged soil, the clay texture of soil is also not recommended as it kills the plant.

Watering

Cardamom grows in rainforest, these areas mostly receives rainfall 200 days annually. So it is essential to keep the soil constantly moist, don’t let the soil to dry out ever. In summer or when the plant is setting fruits, increase watering.

Fertilizer

Supply organic fertilizer that is high in phosphorous and apply it twice a month during the growing season. Also apply 5 kg aged manure or compost per clump annually. Application of neem cake is also recommended.

Harvesting and storage

Cardamom starts to bear fruit from the third year after planting.

Fruit harvesting must be done manually. You can start collecting fruits when they begin to green, dry and easy to break.

After harvesting, dry the pods for 6 – 7 days and store them in an airtight container in a cool, dry place, away from direct sunlight to be preserved for long time.

Pests and diseases

It is generally not attacked by pests. However, some of the pests and diseases that attacks it are:

Cardamom mosaic virus: It is the most serious disease of cardamom. It is a viral disease transmitted by aphids. To prevent this disease keep your plant healthy and never let aphids infect it.

Rhizomes rot:  Its symptoms includes chlorosis of leaves, lower leaves become yellowish, premature fruit drop and decay of the rhizomes also happens. It can be caused by high planting density that prevents aeration or by water logged soil.

Other pests and diseases that might infect or attack it are cardamom thrips, capsule rot and nematodes.

Problems

If the leaf tips turn brown, you either have underwatered it or humidity is low, to increase the humidity level spray the foliage. If overwatered, the roots begins to rot and plant starts to wilt.

Brown spots can occur on leaves if plant is grown under too much sun.

Yellowing leaves are usually a sign of too little fertilization or deficiency of iron.

How to Grow Cloves

How to Grow Cloves | Cultivation and Growing Cloves

Learn how to grow cloves. Growing cloves is somewhat similar to that of the other spices. The scent and flavor of cloves is intense and spicy with a hot note.


It is an evergreen tree and on favorable climates, it grows up to more than 8 meters high, while the cultivated varieties are of a smaller height of around 5 meters.

Clove tree trunk has smooth bark with grayish yellow aromatic foliage. It is a slow growing but a long-lived tree and can exceed 100 years of age easily.

How to Grow Cloves

Clove Cultivation

Growing cloves require humid tropical or subtropical climate. Constant temperature above 50 F (10 C) is essential, the optimum temperature for growing clove tree is around 70 – 85 F (20 – 30 C). You can not grow it outdoors. However, growing clove tree in a pot is possible if proper care is done in winters.

Propagation

Growing cloves from seeds and cuttings is possible. For seed propagation, buy seeds that are recently harvested and not dried out completely since completely dried out seeds are not viable and do not germinate.

Plant seeds as soon as you get them. The seeds don’t need to be covered with soil and should be placed on top of the soil. You can cover the pot or seed tray with the plastic sheet to increase the humidity.

Requirements for Growing Cloves

Position

For healthy and strong growth, it needs a tropical climate. The Clove prefers a semi-shaded exposure similar to black pepper. It can not withstand winter temperatures below 32 F (0 C). So do not plant it outside in an area with cold and harsh winters. However, it can tolerate occasional frosts.

Soil

Soil should be rich and loamy with good drainage and lot of organic matter.

Water

Clove tree grows in wet tropics. It requires regular watering especially when the plant is young (first 3-4 years). Overwatering must be avoided.

Fertilizer

Apply 50 kg aged manure or compost and bone meal or fish meal 2-4 kg per year. Usually, the organic fertilizer is applied in the beginning of rainy season in the regions where clove is cultivated. Once the plant starts to grow, apply 40-gram urea, 110-gram superphosphate, and 80-gram MOP, instead of MOP you can also apply potassium sulfate. The dosage must be increased and for the tree that is mature and older than 15 years apply 600 gm urea,1560 gm superphosphate and 1250 gm MOP per year.The fertilizer must be applied in equal split doses in shallow trenches dug around the plant after the end of summer.

Pests and Diseases

In diseases, it suffers from seedling wilt, leaf rot, leaf spot and bud shedding. Stem borer, scales, and mealybugs are the pests that attack it.

Harvesting

The cloves you use as a spice is actually the result of the harvest of dried unopened flower buds. A Clove tree starts to flower after 6 years of its planting if grown in favorable conditions. However, it takes at least 15 – 20 years reach the full bearing stage.

Because opened flowers are not valued as a spice the unopened buds are picked before they turn pink and when they are rounded and plump. At that time, they are less than 2 cm long. Harvesting must be done carefully without damaging the branches.

The buds once picked are dried in the sun or in the hot air chambers until they have lost two-thirds of their original weight and the color of the bud stem has darkened to dark brown and rest of the bud in slight brown color.

Properties and Benefits of Cloves

Clove is used in the ancient Chinese medicines and in traditional Ayurvedic medicines for its antiseptic and anti-fermentation properties.
Clove is used as a disinfectant in the oral cavity and teeth. The action of clove covers micro-organisms, including viruses, bacteria and fungi. It also has analgesic or anesthetic properties.
Additionally, it treats digestive disorders such as diarrhea, abdominal pain of spastic origin, bloating and dyspepsia. Since it is an antiseptic, it can also be used in a sore throat.
Other Clove Uses

The essential oil is widely used for its aroma and for the preparation of toothpaste, soaps, detergents, creams, perfumes and mouthwashes due to its antiseptic properties. Also, because of its aromatic and preservative properties it is used in alcoholic beverages, soft drinks as well as a condiment with meat, delicious cuisines and various sauces. In Indonesia, it is used in the preparation of Indonesian cigarettes which is made from the mixture of tobacco, cloves, and mint.