Sunday, August 21, 2016

Easy Container Vegetables for Balcony & Rooftop Garden | Container Vegetable Gardening

Easy Container Vegetables for Balcony & Rooftop Garden | Container Vegetable Gardening

Container vegetable gardening allows you to cultivate edibles in smallest of spaces and in this article you’ll find out easy container vegetables which you can grow on your balcony or rooftop garden.

Easy Container Vegetables

Beans

Most of the beans are climbers and really easy to grow. You can grow them on your balcony or rooftop garden on a trellis near a wall and within weeks, you will get a green wall of a climber running up through soft tendrils over the trellis. For growing beans you will need a spot that receives the sun in abundance, a pot that is minimum 12 inches deep and a trellis like structure for support. Since beans fix the nitrogen most of the vegetables that require more nitrogen are good to grow with them. If you’re growing beans in a very large pot you can grow summer savory, kale, and celery in the base.

Tomatoes

Without a doubt, tomatoes are easiest to grow. If you receive ample sun (at least 5-6 hours) you can grow tomatoes. For this, choose a large pot that is 12 inches deep. On a limited space, growing dwarf varieties of determinate type are best. You should also try cherry tomatoes for higher yield.

Lettuce

Growing lettuce in pots is easy. It grows up quickly and you will have the opportunity to harvest repeatedly. Lettuce is a cool season crop and you have to decide what is the right time for its growth according to your climate, usually, seeds are started in spring. But if you live in warm climate, grow lettuce in winter.

For growing lettuce, choose a wide planter rather than deep (6″ deep is enough). Leave space of 4-7 inches between each plant. Remember, leaf lettuces can be grown more closely than head lettuces. Use well draining soil and do shallow and frequent watering to keep the soil slightly moist.

Cucumber

Cucumbers are one of the easy container vegetables though it requires regular watering, full sun, warm temperature and fertilizer. If you have some space, instead of growing dwarf and bushier varieties grow tall, climbing varieties for higher yield. You can grow these varieties on a trellis in a large container in barely 1-2 sqft. of space. 

Peppers and Chilies

After tomatoes, peppers and chilies are easiest to grow in containers and they are most productive too. If you keep the pot in a sunny spot and provide right soil and fertilizer at the time the plant will fruit prolifically. The Large and deep pot that is minimum 12 inches deep is optimum. Pepper plants are susceptible to pests. You will have to keep an eye on aphids.

Carrots

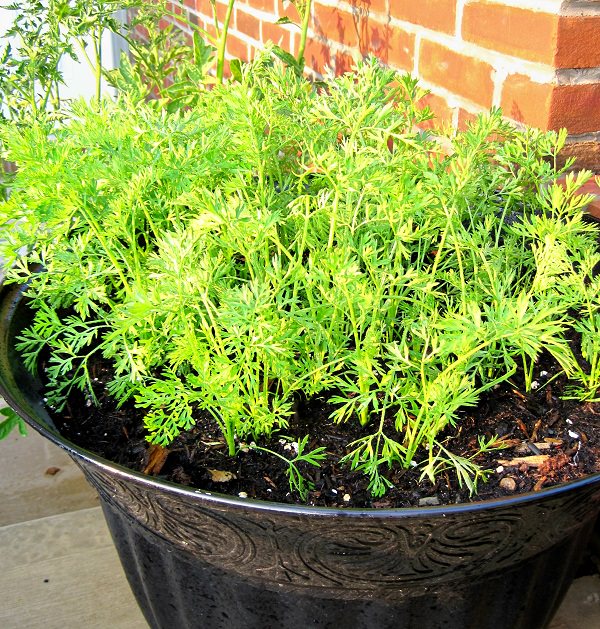
Sow the seeds of carrot varieties that are short instead of standard as they require more room to grow their roots. Choose containers that are deep enough (12″). Carrots are easy to grow in pots if you choose a right variety. Keep the plant in partial sun and water it regularly to keep the soil slightly moist, avoid overwatering. Also, carrots are susceptible to mildew so don’t wet the foliage.

Radishes

Radishes are one of the quickest growing vegetables and suitable for container vegetable gardening as you can also grow them in small pots. A planter that is 6 inches deep is enough but if you are growing larger varieties use 10 inches deep pot. You can plant radishes closely, allow 3 inches of space between each plant in a wide container. Radishes are ready for the harvest in 24-60 days, depending on the variety.

Peas

Peas require moist soil and cool to moderate weather to thrive. All varieties are suitable for container gardening but dwarf bushier varieties are better. A pot that is 6-12 inches deep is enough. You can grow 4-6 plants in a 12 inches wide and deep container, it depends more on the variety you are growing. Keep the potted plants in the partial sun if reach to full sunlight is not possible.

Eggplant

Most of the vegetables grow fairly easy in standard size 5-gallon pot. For growing eggplant, choose a one foot deep and wide pot to provide sufficient space. Eggplant is very productive
vegetable and fruits heavily if you provide it at least 6 hours of direct sun daily. Also, it is a heavy feeder like tomatoes, thus requires regular fertilizing. You have to provide support to plant by staking or caging. Simply poke a stick in the pot to help the plant when it starts to look lean.

Beets

Growing beets in containers on a balcony or terrace is easy. It is a fast growing crop and you don’t need a large container for planting it. A medium sized container that is 6-8 inches deep is sufficient. The soil you use must be permeable and rich in compost.

A Tip

Do mulching, it also helps in container vegetable gardening. Mulch the surface of your potted vegetables with organic matter. It will reduce the process of evaporation and after the decomposition, the organic mulch will provide nutrition to plants.

5 Best Homemade Seed Starting Mix Recipes

5 Best Homemade Seed Starting Mix Recipes

Why splurge money when you can make your own seed mix easily? Check out these 5 Best Homemade Seed Starting Mix Recipes below.

There are seed starting mix recipes with peat or with coconut coir. One suggests to sterilize the soil for 30 minutes at 120 ° C in the oven, another at 180 ° C and a third option is to put soil in 800 watts for 10 minutes in the microwave.

In any case, there are a three basic fundamental things to note for before moving further:

Seed starting mix must be sterilized. It must be low in nutrients and its texture must be light and permeable.

Ingredients for Homemade Seed Starting Mix Recipes

The main ingredients of our seed starting mix are mostly peat moss or coco peat and vermiculite or perlite.

1. Peat moss or Coco Peat

Peat Moss

Peat improves aeration and can save a lot of water. It is acidic and contains less or no nutrients and if you’re using peat, *add 1/4 tablespoon lime per gallon in the mix to balance the pH.

The biggest downside of using peat is it can only be obtained by destroying the remaining Mires. There are peat-free alternatives like coco peat you must opt for.

Coco peat

Best and better alternative of peat moss is coco peat. Coconut fibers are offered in lightweight blocks that swell to become large when water is added. The Benefit of using coco peat over peat moss is that its production doesn’t harm the environment. It also has macro-nutrients and potassium and it is neutral, unlike peat, which is acidic.

Alternatives

Leaf Mold

Leaf mold is a kind of a lazy man’s compost. It is an outcome of the natural rotting process of leaves. You can use leaf mold to sow seeds. Here’s an interesting on The Guardian for you to read.

Pine Bark humus

Bark humus produced from the composting of the bark. The bark originates mostly from conifers. These crusts must be composted for a long period of time. The result is perfect for growing plants: Water permeable and stable structure. The small roots can grow unhindered.

Composted Wood fiber

Wood fibers have similar favorable properties as coir. They are also low in nutrients. The material must, of course, do not come from treated wood waste.

Cat Litter

Cat litter is a good ingredient for plants that require very few nutrients. For example, cacti. With a nutrient-free mixture of perlite or pumice and cat litter, you give seedlings the best ground for rooting.

Important: Use non-clumping, mineral-based cat litter.

2. Perlite or Vermiculite

Perlite

Perlite is a volcanic mineral. It doesn’t absorb water or other nutrients, thus improved drainage. It also has insulating properties that help the plant roots during fluctuation in temperature. *You can also use pumice instead of perlite.

Vermiculite

Vermiculite is light, but unlike perlite, it retains water and nutrients and release that when needed. It also helps in drainage.

Alternatives

Sand

You can use sand if you don’t have perlite or vermiculite. Sand is always there as a part in soil. It is important for a stable soil structure and drainage. Sand does not contain any nutrients.

3. Compost

Compost is used in a few of the seed starting mix recipes given below. If you’re using compost make sure it is fine. You can also use manure instead of it.

5 Homemade Seed Starting Mix Recipes

Make seed starting mix depending on the seeds you’re sowing and their nutrient requirements.

We divided these recipes into three types: Recipe 1, for high energy requirements seeds. Recipe 2 and 3, for medium and low energy requirement seeds.

High requirement seeds are those that require more energy to germinate. Many annual flowers and vegetables, such as potatoes, tomatoes, cabbage, sunflower and geraniums.

Average requirement seeds are the ones that need less energy for germination. This includes Allium, pumpkin, cucumber, snapdragons, dahlias and gloxinias.

Low requirement seeds are those that require less or no nutrients for germination. They are most of the herbs, lettuce, azaleas, begonias, petunias and pansies and most of the plants belong to Crassulaceae family and palm species

Two Basic Seed Starting Mix Recipe

These two basic seed starting mix recipes are easiest, most popular and perfect.

1. The easiest seed starting mix recipe is to add 1/2 part of perlite, vermiculite or sand and 1/2 part of peat moss or coco peat.

2. Mix 1/3 part coco peat or peat moss, 1/3 part compost and 1/3 part of vermiculite or perlite or sand. In such a mix sow seeds that require more energy to grow.

Recipe 1 (High Requirement)

Peat or Peat alternatives 40%
Compost 30%
Garden soil, sand and bark humus 30%

Recipe 2 (Average Requirement)

Peat moss, coco peat or wood fiber 55%
Compost 20%
Sand 15%
Bark humus 10%

Recipe 3 (Low Requirement)

Peat or Peat alternative 50%
Perlite or Perlite alternative 45%
Bark humus 5%

Sterilization

Mix the proportion well before sterilization and make it evenly moist (especially when you are using peat moss). This happens best when the soil is kept in a discarded oven (45 minutes at 150 ° C) or in a microwave oven (10 minutes at 800 watts). This will make your soil disease free.

Caveat: Dried peat moss is flammable.

17 Baking Soda Uses in the Garden | Baking Soda for Plants

17 Baking Soda Uses in the Garden | Baking Soda for Plants

Do you know you can use baking soda for plants? Here are 17 hacks on how to use baking soda in the garden that you will find useful.

Baking soda is used in cooking, in cosmetics and for the maintenance of the house. But its role does not end there: Baking soda for plants can be used.

100% ecological, baking soda can be used at any time of the year, in every corner of the garden. It is biodegradable and nontoxic. It can be a slight replacement for the pesticides, fertilizers and other chemicals you use in your garden.

Baking Soda Uses in the Garden

1. Houseplant Cleaner

It is important to regularly clean the foliage of your houseplants to remove dust and grease, to promote photosynthesis. For this, our recommendation for you is to carefully move a soft, lint-free cloth moistened with the solution of water and sodium bicarbonate (a pinch of baking soda in one liter of water) on the surface of leaves (top and bottom).

2. Clean Garden Furniture

Add 1/2 cup baking soda and 1 tablespoon dishwashing liquid in a gallon of warm water. Take a sponge and clean the garden furniture with it and then rinse it with clear water.

3. Give Plants a Boost

Mix together 1 teaspoon baking soda, 1/2 teaspoon clear ammonia and 1 teaspoon Epsom salt in a gallon of water. Mix well and give each plant about a quart of the solution. This solution will work as a fertilizer, the plants that are looking dull, and growing slowly will perk up, rejuvenate their growth and become lush green.

4. Keep the Smell of Compost away

To keep the smell from compost pile under control, use a small amount of baking soda to eliminate odor. This helps prevent acidity build up.

5. Clean Bird Bath and Pots

To clean your bird bath and pots, sprinkle baking soda on it and clean with damp cloth or scrubber. After cleaning, rinse thoroughly and allow them to dry out completely.

6. Get Rid of Slugs

Want to get rid of slugs? Simply sprinkle baking soda on them.

7. Encourage Plants to Bloom

Dissolve 1 tablespoon of baking soda into 2 quarts of water and use this to water your flowering plants to encourage blooming.

8. Sweeter Tomatoes

Sprinkle a small amount of baking soda around the base of your tomato plants. The baking soda will be absorbed into the soil and lowers the acidity level of tomatoes, thus gives you sweeter than tart flavor.

9. Acidic Soil

If you have acidic soil, sprinkle a small amount of baking soda on it (application rate varies according to the pH level). When digging, mix it and water and retest your soil after a few days. Do this on the small area first. You will be impressed by the results: Fewer weeds, more flowers, and high-yield garden.

10. Kill Cabbage Worms

Mix equals part of flour and baking soda and dust that on infected plants. The worms that inflicting your brassicas will ingest the baking powder mixture while eating the leaves and die soon.

11. Test Soil pH

Take some soil on a dish and make it muddier. Sprinkle a small amount of baking soda onto the soil. If the combination bubbles, your soil is acidic.

12. Use it as a Pesticide

Use baking soda to effectively reduce infestations of many insects such as aphids, scales, and the spider mites. It may not kill them all but have a repellent action and halt their progress.

Mix 1 teaspoon of baking soda and 1/3 cup of olive or mustard oil. Measure out 2 teaspoons of this mix and add it to 1 cup of water. Mix it well together and spray it on the infected plants.

13. Prevent Mildew and Other Fungal Diseases

Spraying baking soda on the leaves makes the surface become less acidic and limits the ability of fungal spores to grow. To prepare this, mix 1 teaspoon baking soda and a few drops of liquid soap in 1 liter of water and spray the solution on the infected plants.

This preventive and curative treatment is effective in the vegetable garden, on the fruit trees, rose bushes, vines and climbers and flowers.

14. Weed Killer

To fight effectively against the weeds that invade walkways, edges and garden beds in an ecological and economical way, baking soda is best. It has the enormous advantage of being completely biodegradable and nontoxic. So you can sprinkle it on the tufts of weeds. It will burn the foliage and weeds will fade and disappear in a few days. It can also be used to prevent the weeds, it will slow down the arrival and growth of them. It can also be used in the crevices of pathways to kill the weeds.

15. Clean the Walkways

Rinse the surface with sodium bicarbonate water (30 g or 2 tablespoons per liter of warm water). If necessary, add baking powder and scrub with a brush or use a broom with stiff bristle.

Beware not to spill the solution on the lawn and flower beds: An excessive concentration of bicarbonate and hot water can “burn” the plants.

16. For Cut Flowers

To keep your cut flowers fresh for a long time put a teaspoon of baking soda in the vase.

17. Clean dirty hands

Got dirty hands after gardening? Simply rub baking soda on wet hands and rinse them with water.

Precautions when using baking soda in the garden

Avoid as much as possible to spray directly on the flower stalks and flower buds.

When trying any home mix, you should always test it out on a small portion.

Also, follow the right dosages because the too strong combination can burn the leaves of the plants.